Using All in One Grow Bags
Using all in one grow bags
So-called ‘All in One‘ grow bags are a popular choice both for newcomers and growers of certain specific mushroom species. Using all in one grow bags is relatively easy, provided you do things correctly. For the benefit of those who haven’t tried growing mushrooms before, we’ve put together a simple guide on the steps you need to take, plus an explanation of some of the vocabulary you’ll see.
It takes a while to explain things step by step, and a little while to read the instructions, but the actual work involved is quite small. Patience is the key when using all in one grow bags – patience to read instructions, patience to ensure everything to do and touch is sterile, patience to wait while mycelium takes over your grow bag and then a little more patience to wait for the actual mushrooms to start fruiting, but it all pays off in the end!
The Basics
 All in one bags
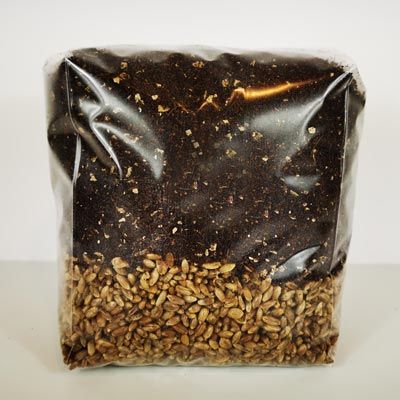
‘All in One’ refers to bags which are supplied complete with both grain (to be used to start the growing process) along with substrate – in this case CVG substrate. These bags effectively create a garden for your mushrooms to grow in. All you need to do is add your own mycelium liquid culture.
CVG All in One Bags
All in one grow bags with CVG substrate are only compatible with ‘manure loving’ mushrooms and are not compatible with ‘wood loving’ mushrooms. Before buying you should check what type of substrate the type of mushroom you want to grow requires.
Inoculation – Inoculating your bag
Inoculating your grow bag is effectively the process of ‘seeding’ it by injecting it with inoculate material such as liquid mycelium culture
Spore Syringes
We never recommend using spore syringes because (1) growth is slower than using liquid mycelium culture and (2) the contamination risk is significantly higher.
Liquid Culture Syringes
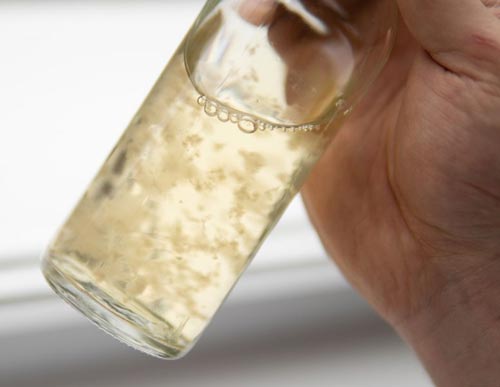
Liquid culture syringes for most types of mushroom are readily available online. Liquid culture syringes contain live mycelium in a nutrient solution.
Colonisation
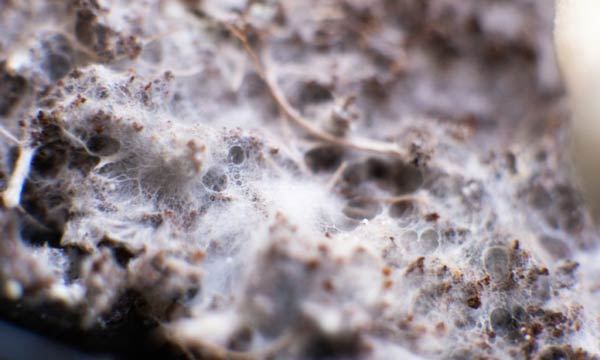
After your grow bag is inoculated with liquid culture, mycelium will start to grow and colonise the grain. When this happens you will start to see white growth in the areas of the bag where your liquid culture was injected. When colonisation is complete, all the contents of the grow bag will be covered with healthy white live mycelium.
All in One – Product Guide
Using All in One Grow Bags
Basic process
In simple terms you need to inoculate the grain section of the bag with your chosen liquid culture. In effect, this ‘seeds’ the your grow bag. After inoculation, mycelium should start to form, which looks like white mould spreading across the grain. After a few weeks the whole block will be colonised and at that point you move to the ‘fruiting’ stage, when your mushrooms will begin to grow. It’s not a quick process (taking several weeks), so patience is always essential.
Before you start – Keep Records
Any experienced mushroom grower will tell you that the biggest issue you need to avoid is contamination. It can happen to anyone at almost any time, and you need to take great care to avoid it. When contamination occurs, because it will, sooner or later, being able to work out how it occurred will help you prevent further outbreaks in the future.
Our grow bags are produced under strict sterile conditions and the contents thoroughly sterilised to kill pre-existing contaminants. However, for your own peace of mind you should set aside your grow bags aside 5-7 days, leaving them in a cool, dark location. Most contamination types will be visible 3-7 days after they are introduced, so if your grow bag looks good a week after receiving it, this confirms its sterility. Knowing this will help you to trace where any subsequent contamination came from. Knowing this, if you keep a simple diary of everything you do with your grow bags you should be able to backtrace when any contamination was introduced.
Basic Work Environment
Ideally, you should do any ‘mushroom work’ in front of a laminar flow hood or inside a ‘still air box’ (made from plastic tote boxes). If you don’t have either of those things, you need to work in a small room where the air is “still”. This means closing any windows and doors, turning off central heating and leaving the air in the room to settle for one to two hours beforehand. Once the air in the room stops moving, much of the bacteria and airborne spores that are in every house will fall from the air. Before starting work, clean all surfaces with 70% isopropyl alcohol, use disposable nitrile gloves and, if you have some left over from covid, wear a simple facemask to cover your breath to give added protection.
Step 1 – Preparation
Before using all in one grow bags, disinfect your hands, all surfaces and all the equipment you will be using with 70% alcohol. If possible, use disposable nitrile gloves and a facemask.
Step 2 – Inoculation
 For this step you need some Mycelium liquid culture, typically supplied in syringes unless you make it yourself. Prepare your liquid culture syringe, removing it from its packaging and attach the needle that should have come with it. Avoid touching the needle itself. If you are re-using a needle, flame sterilise it (red hot) before use and cool it by sucking in and ejecting a small amount of liquid culture.
Use a sterile wipe to disinfect the black injection port on your grow bag. Gently shake the syringe a few times to distribute the mycelium evenly, then push the needle into grain section of the bag via the injection port and inject 5-10ml of culture into the bag. Putting a strip of tape over the port is a good idea after you’ve used it, to prevent it getting knocked off, which would expose the hole made by the syringe.
Carefully pull air into the top of the bag by pulling the neck gussets apart, allowing a small amount of air to enter the bag via the air filter – never touch the filter itself. Pulling the gussets apart around the filter will cause air to be drawn inside, and mycelium needs a little air to be able to grow. Make sure there is a small open space behind the filter so that air can enter the bag – there’s no need for a lot of air as more will be drawn in naturally over time. Take care not to handle your bag roughly, as this can cause holes and tears to appear, especially around folds, seams and creases. Getting over-enthusiastic can lead to burst bags or digging holes with your fingernails.
Find a space where your all in one bag can sit undisturbed, out of sunlight and at a constant 19-23C (the exact incubation temperature depends on the species of mushroom you are growing). Airing cupboards are rarely a good idea as temperature will vary significantly. Leave the bag undisturbed for one to two weeks before being tempted to check progress.
Step 3 – Mixing
 After one to two weeks, the first signs of colonisation will appear. You’ll notice white blotches appearing around areas of grain. This is live mycelium growing. Satisfied, leave the bag alone for a couple of weeks before looking again. By then, a large percentage of your grain will have been colonised by mycelium. Once it is at least 75% colonised, (100% is best) gently manipulate the bag to break up the grain and mix it with the substrate. Never open the bag at this stage! Mixing the contents will speed up the remaining colonisation process.
Return the bag to its incubation location and leave to incubate fully, until the bag contents become one solid lump, covered in mycelium. Once you are sure the bag is fully colonised, leave it for a further 5 days to ‘consolidate’ and ensure the very centre of the ball is fully colonised. If you see ‘pins’ (tiny mushrooms) starting to form this confirms full colonisation.
Step 4 – Fruiting
Once your all in one bag is fully colonised, it is ready for the fruiting process. Mushrooms need a trigger to start their reproduction process (which causes the mushrooms to grow). You can start the fruiting process by cutting the top section of the bag off, just below the heat seal. Once cut open, leave the neck of the bag loosely folded, allowing small amounts of air to enter but also trapping humidity inside the bag. Maintaining humidity in your all in one bag is very important as mushrooms need it to grow.
Your bag should be kept out of direct sunlight and kept at the recommended fruiting temperature for the specific mushroom type you are growing. Check with your liquid culture supplier if unsure. Failing that, google search is your friend. Air inside the bag needs to be refreshed 4-5 times a day and to do that simply hold the sides of the bag, push existing air out of the bag and then pull more in. Maintaining humidity is important – you want to see condensation on the upper sides of the bag. If the bag seems to be drying, gently mist water inside the bag with a very fine spray once or twice a day, only spraying the sides of the bag and not the growing block itself.
Step 5 – Harvesting
When you should harvest your mushrooms depends on the exact type of mushroom you are growing, but as a general rule when your mushrooms get bigger they’ll develop a veil under their caps, a bit like a thin layer of skin. Once this veil tears, a mushroom is ready to be picked. To pick a mushroom, grasp the bottom of the stem, twisting and gently pulling upwards. You want to disturb the mycelium it grew from as little as possible.
Step 6 – Eat or otherwise consume….
Step 7 – Additional Flushes
Each harvest is referred to as a flush and if you do it right, you should get 2-3 flushes from your bag. You’ll often find that mushrooms from the 2nd flush are the largest. Once you have picked all the mushrooms from your first flush, spray the insides of the bag again and put it back into incubation again. Typically, a second flush will appear a week or so later.
